Instructions to configuring the room bookings for the Outlook Calendar data provider with user privileges, for the meeting room integration. Microsoft Office 365 requires global administrator level permissions for a service account to handle meeting room bookings across an organization.
However, if you do not wish to use global permissions, you may now configure the booking functionality using a user account, with access to book only rooms that have been delegated to the this user account. End users has to give consent to allow syncing bookings in the private calendar of the users. This is different comparing to the 'full admin rights integration'.
We recommend creating an account in Office 365. This account will be used for authentication when configuring the integration. We will call this the booker account.
1. Create a booker account
Add the basic account information, such as:
-
First and Last name
-
Display name
-
Username and Domain (email address)
-
Location
-
Password
-
Roles – Select user (no administrator access)
(You may skip all optional information.)
* make sure the user has a "Microsoft Teams Exploratory" licence (Exchange online)
2. Create an application
In azure you have to register an App specific for this integration.
3. Delegate access for resource’s calendar to booker account
You now need to provide your booker account with access to each meeting room’s calendar, a process known as delegate access. This will allow the room booking integration to make bookings on Microsoft Outlook Calendar via the booker account that is used to authenticate calendar access.
-
Sign in to Office 365 admin center (admin.microsoft.com) with your administrator credentials.
-
Navigate to Resources > Rooms & equipment.
-
Click the room name, and click Show all in the Delegates section.
-
Click + Add delegates, and select your booker account.
-
Click Save.
-
Click Edit Exchange settings, and click booking delegates, and ensure the following settings:
-
Ensure the Select delegates who can accept or decline booking requests option is selected under Booking requests.
-
Ensure the booker account is added to the Delegates section.
-
-
Click Save, and click Close.
-
Repeat the above steps for all resources (meeting rooms).
* it can take some time before the new user is visible while setting up delegated access for the resources. Through "Edit Exchange settings" it will be sooner available.
4. Configure resource calendar permissions
You would now need to configure the meeting room’s calendar to allow read write permission to the resource calendars. To configure Office 365 resource booking permissions, follow the instructions below:
-
Sign in to Office 365 with your booker account credentials.
-
Go to the Office 365 Calendar, click your name in the top right corner, and select Open another mailbox from the drop-down list.
-
Enter in the resource name, and click Open. The resource account opens in a new tab.
-
Navigate to the resource account Calendar, and right-click on Calendar, select Sharing and permissions.
-
Enter in the email of the booker account in the Send a sharing invitation in email to share the calendar. Select Delegate from the drop-down list, and check the Let delegate view private events checkbox.
-
Click Share, and click Done.
-
Once done, navigate back to the email tab for the booker account, and accept the calendar invitation that was sent from the resource account.
5. User consent
-
In zapfloor you have to enable "Require user consent" and "connect with a service account" to authenticate on service account / user account level and not admin permission level.
-
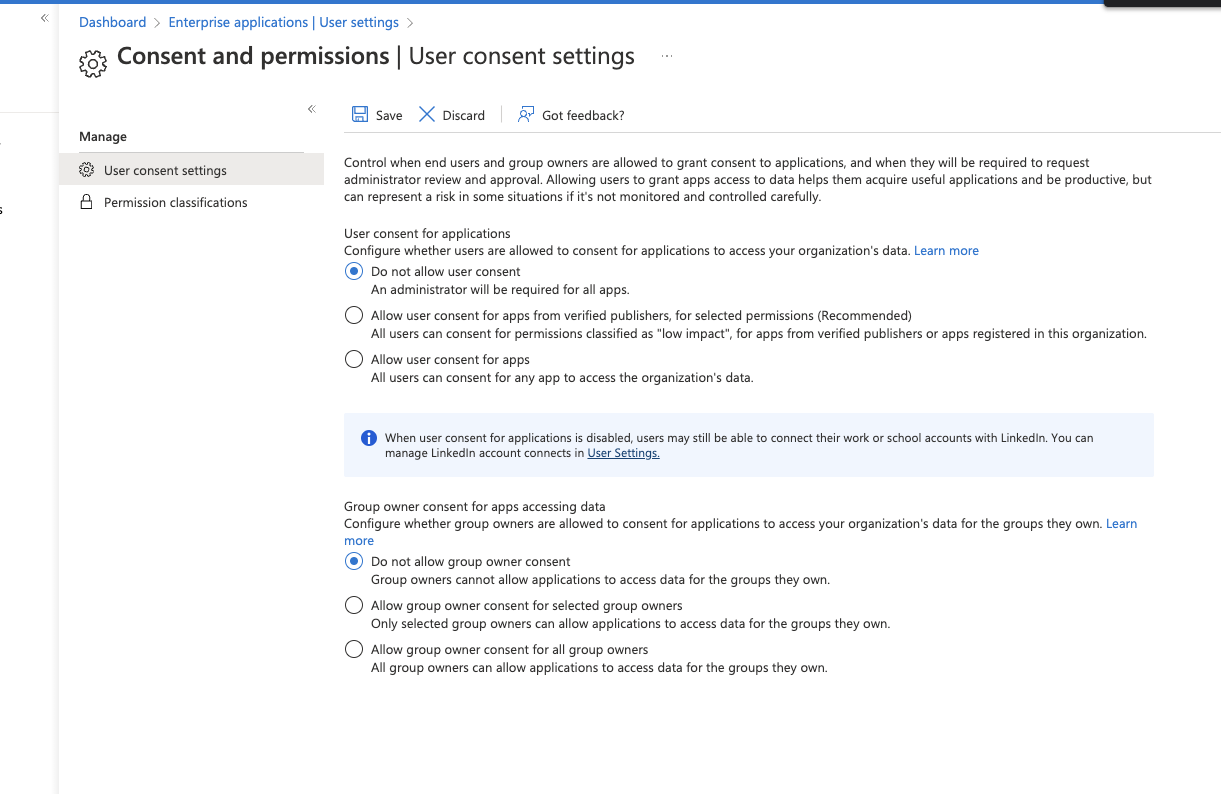
If your organisation does not allow users to give consent to any application, like is setup in this screenshot, you have to follow some steps which are explained bellow. To go to this page, go to enterprise applications -> user settings and click on "consent and permissions"