Prequitises:
- Papercut integration (Get in touch with your CSM)
- Admin level access to Papercut
Configuration:
Navigate to Integrations > Papercut
Then head to Organisations from the Papercut dashboard:
Organisations
Here you'll get an overview of all customers (companies) in your account. If you'd like to give a company access to the printer software, click the plus (+) on the right side of their company name.
When you've added them, the plus changes to 4 icons:
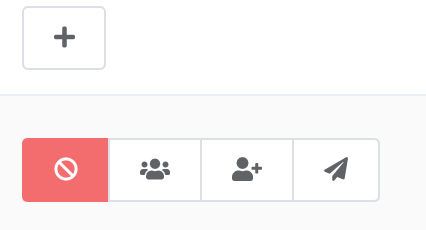
🚫: Disable - Deactive this company in Papercut
👨👦👦: Manage users - Shows all users from this company
🙎♂️+ : Enable all users - Adds all users from this company to Papercut
✈ : Send Information - Send all users from this company their Papercut login
Manage users
When you click on Manage users (👨👦👦), you'll find a list of all users created in this company in ZapFloor.
From this list, you can give each user access. If the user already has access, you can see or resend them their code or disable them in Papercut.
Sending out the info results in a mail stating:
-
We're now using Papercut and you can use this to print.
-
You can download the printersoftware here.
-
Here's your credentials.
The pincode mentioned for each user, is what connects their ZapFloor account to their Papercut account.
Papercut software that needs to be installed by tenants on their laptop
Tenants can print by installing the Papercut software through the link which is included in the email send by zapfloor with their credentials.
They need to sign in with the credentials on their laptop ones to authenticate who is printing.
NOTE: If the user was using Papercut before with a manual created user and not from zapfloor sync, the user needs to uninstall the software on their computer and reinstall + authenticate again.
Pincode to login on Papercut through Printer
Zapfloor support pincode login on Papercut through the printer screen. The pincode is equal to the initial password of the user which is included in the email.
The pincode length contains 9 numbers(primary card number) because of multiple reasons:
-
It’s more secure so no others can login and see your prints
- Duplicates can happen more easily with 3 digits
- You can also link your badge to Papercut.
To allow users to view their number in the user web portal of Papercut, you need to enable this feature. Select the Allow users to view their card/ID numbers check box in Options > General > User Features. Specify whether you want users to view their primary or secondary card/ID number. Read more here: https://www.papercut.com/help/manuals/ng-mf/applicationserver/user-card-id/
Printing with a badge
If you have a badge scanner at your printer, your users only have to link their username and code to their badge once at the machine. From then on, their badge will be enough for the system to recognise them.
This is explained to your user in the e-mail they will receive.
WATCH OUT: You can only link one 1 account per badge.
PS: The users can see the balance on the printer itself when they are printing!!!
If another user links their badge to the same account, the old badge will be disabled.
To link to old badge again, you need to log into the Papercut portal. Help for this scenario via support@zapfloor.com
Editing a user's email address in Papercut:
Disable user with wrong e-mail.
In Zapfloor > Go to Settings > My Apps > Papercut > Organizations > Go to campany > Go to user - red button ⛔️
Change e-mail in Zapfloor:
In Zapfloor > Customers > Select company > Select user > adjust e-mail > Save
Enable user again in Papercut:
Zapfloor > Settings > My Apps > Papercut > Organizations > Go to campany > Go to user - white plus button ➕