Comprehensive Guide to SaltoKS Integration with Zapfloor
1.Introduction to SaltoKS and Zapfloor Integration
2.Initial Setup and Configuration
2.1 Connecting SaltoKS with Zapfloor
2.1.1 Create a Salto User for your Zapfloor CSM
2.2 Detailed Settings for SaltoKS Integration in Zapfloor
2.3.1 Individual lock settings
4.3 Discovering the User Associated with a Badge Number
5.Troubleshooting
5.1 Verify customer subscriptions to guarantee they have the required permissions and privileges
5.5 Remote Door Opening During Meetings
1. Introduction to SaltoKS and Zapfloor Integration
SaltoKS is a sophisticated cloud-based access control system that seamlessly integrates with Zapfloor, enhancing building management capabilities across various platforms. This integration provides a streamlined interface for comprehensive user management and dynamic access control.
By connecting SaltoKS with Zapfloor, you unlock a suite of enhanced features:
- Advanced User Management: Directly manage user profiles from Zapfloor, with capabilities to automate processes for adding new users and archiving inactive ones, ensuring that user data is always up-to-date and accurately reflected in both systems.
- Dynamic Access Groups: Leverage contract data within Zapfloor to create tailored access groups. This feature ensures that employees and members receive access permissions that are perfectly aligned with their current roles and contract terms, enhancing security and operational efficiency.
- Reservation-Based Access: Automate access permissions based on real-time reservations for meeting rooms and desks. This functionality allows for seamless entry to reserved spaces, improving user experience and resource management.
- Mobile Access Capability: Empower users to unlock doors using their smartphones with the Zapfloor app. This tag-free access option not only enhances convenience but also reduces dependency on physical access tokens, making entry processes smoother and more eco-friendly.
- Pin Code Access for Externals: Manage access for external people who book your meeting rooms/desks in the most efficient way by simply sending a unique pin code for the duration of the booking that can help them access the building without any manual intervention on your behalf.
This integration not only simplifies administrative workflows but also enhances user convenience and security, making it an ideal solution for modern workspace management.
2. Initial Setup and Configuration
2.1 Connecting SaltoKS with Zapfloor
The SaltoKS integration AddOn in Zapfloor needs to be activated. This is a prerequisite for initiating the setup process. To enable this please get in touch with your Customer Success Manager at support@zapfloor.com
2.1.1 Create a Salto User for your Zapfloor CSM
- User Creation in SaltoKS: Log into the SaltoKS application to create a new user. This user acts as a bridge for the integration, so it's crucial to handle this step with care.
- Naming the User: Assign the user a name that clearly indicates it should not be removed, such as "DO NOT REMOVE". Removing this user could disrupt the connection between SaltoKS and Zapfloor.
- Assigning Role: Designate the user with the "Site Admin" role. This level of access is necessary for managing the integration settings and ensuring that the user can perform required actions within SaltoKS.
2.1.2 Connect the Accounts
- Accessing Integration Settings: Navigate to Integrations > Salto in your Zapfloor dashboard.
- Connecting Accounts: Use the 'Connect' button to link your SaltoKS account with Zapfloor. Ensure that you are logged out of other SaltoKS sessions and have cleared your browser cookies to avoid linking the wrong SaltoKS account.
2.1.3 Verify Connection
- Confirmation: After clicking 'Connect', ensure that the accounts are fully synchronized by checking the status in the Zapfloor integration settings.
2.2 Detailed Settings for SaltoKS Integration in Zapfloor
The integration of SaltoKS with Zapfloor offers several settings that optimize how access is managed across various user scenarios. Understanding and configuring these settings properly ensures a seamless experience for users and administrators alike. Here’s a detailed look at some of the most important settings:

- Auto-create Users: This setting enables the automatic activation of users added to Zapfloor. It simplifies the process by eliminating the need for manual user activation in SaltoKS.
- Auto-create Visitors: Similar to users, this setting allows for the automatic activation of visitors within SaltoKS, which is beneficial for organizations with high visitor traffic. Use this feature only in specific cases; for details or exceptions.
- Enable Salto KS in Members App: Activating this setting makes the "Open Door" button available in the mobile app provided to users, allowing them keyless entry through their smartphones. This is essential for facilitating smooth access and enhancing user convenience.
- Keep Email Address Private: This setting, when enabled, ensures that email addresses are not publicly displayed or shared. It's particularly useful in scenarios where user privacy is a priority. Contact support@zapfloor.com for more information on when and how to use this setting.
- Auto-create Access Groups:
- For Hotdesk Reservations: Automatically creates access groups when a hotdesk reservation is made, ensuring the user has access during the reserved time.
- For Meeting Room Reservations: Similarly, access groups for meeting rooms are automatically created, aligning access times with booked periods.
- For Contracts: When a contract status is changed to signed, an access group is automatically created, reflecting the new access permissions granted by the contract.
- Extended Access Timing:
- Meeting Room Reservations: Extend the access period for meeting room reservations to allow early entry and late exit, accommodating meetings that may start early or run over time. Specify the additional time that can be added before and after the booked period.
- Desk Reservations: For hotdesk reservations, extend access times to provide flexibility for users who arrive early or need to stay longer than planned. Define the extra time that can be granted at the beginning and end of the reservation.
Configuring these settings correctly ensures that access rights are dynamically adjusted to meet the real-time needs of users, enhancing both security and operational efficiency. It's crucial to review these settings periodically to ensure they continue to meet the evolving needs of your organization.
2.3 Lock Configuration
To efficiently manage access across your facilities, each lock must be correctly configured once the SaltoKS account is connected to Zapfloor. This setup involves linking each lock to relevant units for contracts and hotdesking, to meeting rooms for specific reservations, or to contract types for broader access control (usually for common areas). The initial setup of locks is a one-time process, but modifications can be made as needed and will take effect after the system updates overnight.

2.3.1 Individual lock settings
Begin by navigating to Integrations > Salto > Locks in Zapfloor. Here, you will find the interface where locks are assigned and managed. By clicking 'View' on each lock setting, you can delve into specific configurations tailored to your organizational needs.
Each lock within the SaltoKS system needs to be configured to associate it with specific resources in Zapfloor, such as units for contracts, meeting rooms for reservations, and contract types for broader access control. This targeted configuration ensures that access control measures are precisely tailored to your operational needs.
- Units: Link locks to specific units that are utilized in contracts or hotdesking. This setting is vital for enforcing appropriate access control in line with contractual terms. For example, if a lock provides access to a private office or desk space, it should be linked to specific resources in Zapfloor that delineate who can access these areas.
- Meeting Rooms: It is crucial to ensure that locks are connected to meeting rooms. Consider the pathways that attendees will take within the building to guarantee that all necessary doors can be accessed. This consideration is particularly important when non-members use Salto to access meeting rooms; ensure that all relevant locks are linked, from the front door to the meeting room door, to facilitate smooth entry.
- Contract Types: Utilize this setting to grant access based on contract types, such as those for coworking spaces. If a space is generally used by various groups, access can be assigned based on contract type. For instance, everyone with a Coworking contract might have access to the Open Plan Work Space lock and the Office Kitchen lock.
2.3.2 Setting Up PIN Codes
PIN codes provide a versatile and secure method for granting building access to visitors or users who may not use a traditional tag or mobile app. This feature is particularly useful in managing temporary access or for users preferring a non-digital mode of entry.
Ensure that your SALTO locks are equipped with keypads. This hardware feature is necessary for entering PINs.
Usage:
- Personal and Non-Transferable: Each PIN is personal to the user to whom it is assigned and should never be shared. Sharing PINs can compromise the security of your facility.
- Consistency: The PIN remains constant for each user regardless of the number iof bookings unless administratively changed, streamlining access without compromising security.
Access Control:
- Entry Validation: PINs are recognized at the keypad; however, actual access is contingent on the user’s current permissions as defined in their access group.
- Time-Restricted Access: Access is only granted during the times specified within the user’s individual access settings. This measure ensures that access is only available when appropriate, enhancing security and compliance with your facility’s operational policies.
Important Considerations:
- Avoid resetting PINs through the SALTO interface. If a PIN is reset, ensure to update the information in Zapfloor and inform the user promptly to prevent access issues.
2.5 Automated door operations
To facilitate automated door operations during meetings, linking SALTO KS' IQs with your Zapfloor account is essential.
Begin by navigating to Integrations > Salto KS > IQs within Zapfloor. Here, each IQ device needs individual setup to function correctly. Open the settings for each IQ and enter the PIN and OTP as verified on your Salto Mobile app. This setup enables each IQ to autonomously open meeting room doors during scheduled meetings, significantly enhancing the ease of access and user experience during business operations. For more detailed instructions on generating OTPs and further technical information, please visit Salto KS Developers.
Prerequisite: This feature is only functional when the PINs per IQ have been set up successfully.
To enable this feature, navigate to Integrations > Salto > Locks. For each lock, you can simply check the box labeled "Office Mode Allowed" to activate this function when you open it.

➡️ At the beginning of meeting (or buffer if applied) door jumps “open” (=into office mode)
➡️ until the end of the meeting, then (or after buffer if applied) it closes (= jumps out of office mode)
Office mode during reservations will only work when the OTP for every IQ is configured correctly. For example when a new IQ is installed, the OTP need to be configured for this new IQ.
Troubleshooting
If you are experiencing issues with locks that are not opening, it is important to follow these steps to identify the root cause:
- Check if the "office mode allowed" option is enabled for the lock in question.
- Verify if an access group exists for the reservation, as this is a necessary requirement.
- Confirm whether other locks linked to a different IQ are still opening properly.
- If the above steps do not resolve the issue, reconfigure the OTP for the specific IQ in Zapfloor.
It is crucial to ensure that all settings are correctly configured to enable the smooth operation of the locks during meetings or reservations. By following these troubleshooting steps, you can address any issues related to locks that are not opening as expected.
If you encounter the API response "Request execution failed with code: otp_blocked" when trying to enable office mode for a lock, simply wait for 20 minutes and then retry. For more information on error status codes, you can visit https://saltoks.com/developers/core/errors.
2.6 Mobile Access
Enable mobile keys via Integrations > Salto > Settings in Zapfloor, allowing users to open doors using their smartphones.
3 Access Groups
Access groups in SaltoKS play a crucial role in defining who can access what and when. For subscriptions, the process involves more than just grouping users; it’s about aligning access permissions directly with user subscriptions and contracts.
3.1 Access group creation based on Subscriptions
Here’s how to manually create an access group related to a subscription:
- Navigate to Customers > Select customer > Subscriptions.
- Open the subscription and select More > Sync with SaltoKS.
- This action triggers the creation of an access group that corresponds specifically to the subscription details, including the time and resources accessible as per the subscription terms.
- These groups ensure that access rights are dynamically aligned with the status of the subscription, providing automatic updates whenever changes occur, such as subscription renewals or cancellations.
4. User and Access Management
4.1 Activating Users
Zapfloor's integration with SaltoKS allows for seamless activation of users to ensure access to facilities.
Step-by-Step User Activation:
- Navigate to the Contacts section in your Zapfloor dashboard.
- Choose the user you wish to activate. This could be a new user or someone whose access needs to be updated.
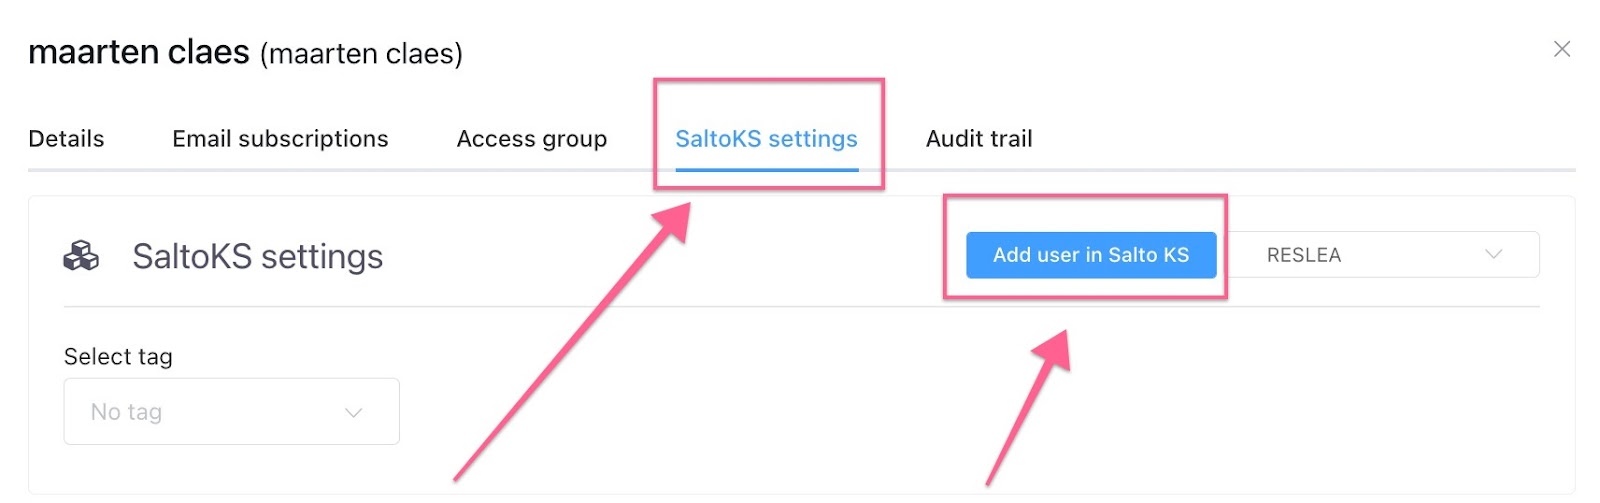
- For the selected user, go to the SaltoKS Settings. This area lets you manage specific access control settings linked to SaltoKS.
- Click the Activate user in Salto KS button. This action initiates the activation process, linking the user's profile with the necessary access permissions in SaltoKS
- Please note that the user should always be synced from Zapfoor to SaltoKS and not the other way around
Considerations for Existing Users with Tags:
If the user already possesses a registered tag in SaltoKS, you can utilize the Select Tag field within the user’s SaltoKS settings.
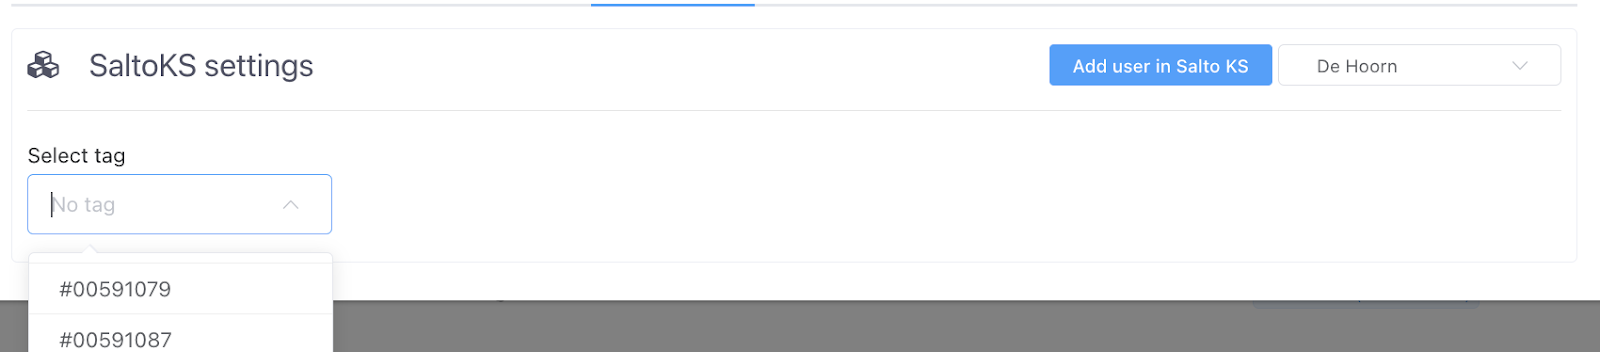
This allows you to link the existing tag to the user’s profile, ensuring that their current access permissions are seamlessly integrated without the need for issuing a new tag.
4.2 Deactivating Users
Navigate to Contacts > Search the user > Open the user > SaltoKS settings > click Delete in Salto (red button). This action will deactivate their Salto user access.
4.3 Discovering the User Associated with a Badge Number
By following these simple steps, you can easily identify which user is linked to a particular badge number within your system.
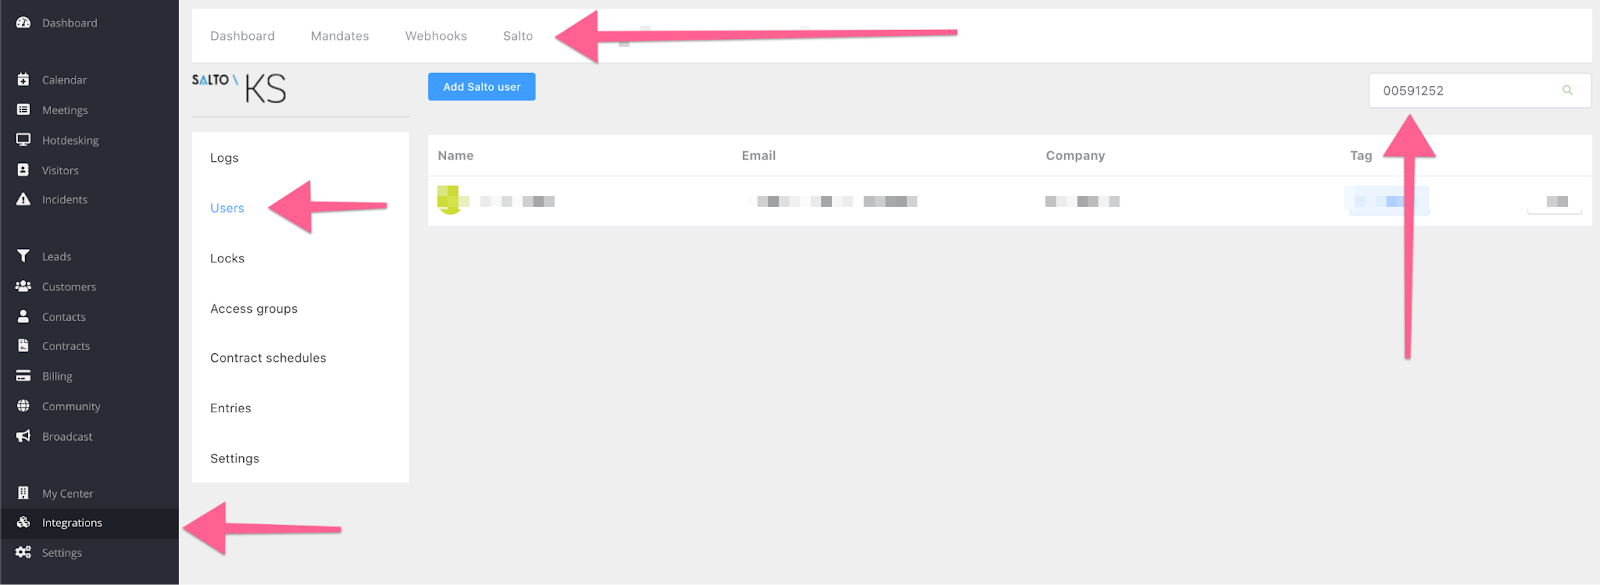
- Navigate to Integrations > Salto > Users in your system.
- Locate the search box within the Users section.
- Enter the badge number you are looking for, without including the '#' symbol.
- Hit the search button or press enter to initiate the search.
- The system will display the user connected to the badge number you entered.
5. Troubleshooting
5.1 Verify customer subscriptions to guarantee they have the required permissions and privileges
To check a customer's access linked to subscriptions, start by connecting units and standard contracts to your locks in an access integration.
Follow these steps to ensure complete access has been created:
Step 1: Navigate to the customer profile, open the Subscriptions tab, and copy the subscription ID associated with the customer.
Step 2: Access the Integrations menu, select Salto, and then navigate to the Access Groups section.

Step 3: Within the Access Groups, utilize the search box to paste the subscription ID and hit enter to initiate the search.
Step 4: Open the corresponding access group to review the current locks included in the customer's access.
By following these steps, you can effectively check and verify the access linked to a customer's subscriptions, ensuring that they have the necessary permissions and privileges.
Additional Troubleshooting Tips:
- If everything above seems in order and still there are locks missing in the access group that’s created then please check if recently a lock was replaced or deleted in your Salto environment
- If everything seems in order as mentioned above and you still don’t see users in the access group then please go through the users list in Zapfloor for that specific company and check if the user is deleted in Salto but not from Zapfloor (the page will keep skipping). In this case delete the user from Zapfloor (Contacts > User > SaltoKS Settings tab).
- If all the checks are done and everything seems in order and still the user cannot access the door then check in your Salto environment in Events > Filter > People > add the user’s name. If it says Lock Rejected and NA on Event Details, please get in touch with your Salto provider as more often than not this has got to do with the lock itself.
5.2 Connection Issues
If there's no data in Integrations > Salto in Zapfloor, the connection may need to be re-established.
5.3 Lock Offline
Check with your lock installer if a lock is offline, potentially due to WiFi problems or hardware issues.
5.4 Error Messages
Address specific error messages such as "unauthenticate to create saltoksuser," indicating a permissions issue. Ensure that the linked user has the "Site Admin" role.
5.5 Remote Door Opening During Meetings
If you encounter issues with remote opening of doors during meetings, even though you've enabled your meeting room locks to go into office mode, please follow these troubleshooting steps:
- Check Lock Links: Confirm that the meeting rooms are correctly linked to their respective locks. You can verify this in Zapfloor by navigating to Integrations > Salto > Locks.
- Verify Remote Opening Settings: Ensure that the Salto user who enabled remote opening and set up the PINs for the IQs remains active. Remote opening is facilitated through these IQs and their PIN codes, and it will cease to function if the user is disabled.
- Check Salto User Status: The Salto user responsible for enabling remote opening and setting up the PINs for the IQ devices must be active. Remote opening functions through these IQs and their assigned PIN codes. If the user is disabled, remote opening will not work.
- Also if you get the below error you need to contact your hardware provider right away: