![Avatar 8-1.png]](https://support.zapfloorhq.com/hs-fs/hubfs/Avatar%20%208-1.png?height=40&name=Avatar%20%208-1.png)
Benefits
By embedding the Zapfloor Booker, you can:
- Let external customers book meeting rooms or desks without being redirected to another website.
- Show only spaces that are available for the selected date and time, preventing users from clicking on unavailable rooms.
- Keep the booking experience consistent with your own website and brand.
- Automatically sync all bookings with your Zapfloor workspace in real time.
- Accept external bookings for meeting rooms and desks to generate additional revenue.
Before You Start
Before setting up the Zapfloor Booker, make sure you have:
- ✅ Administrator access to your website
- ✅ A Zapfloor API token
- ✅ A connected Stripe account
- ✅ External bookings enabled for your workspace
Setup the booker
Step 1: Get Your API Token
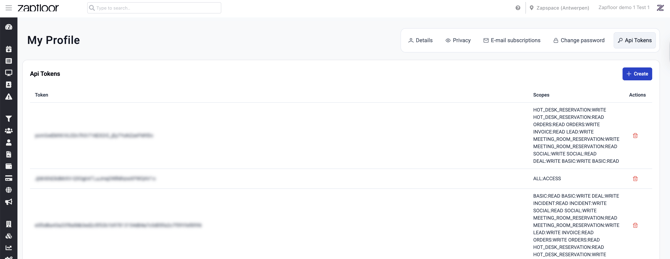
Your API token securely connects the booking application to your Zapfloor account.
To find your token:
- Log in to your Zapfloor Operator Dashboard.
- Navigate to Profile → API Tokens.
- Copy an existing API token, or create a new one if needed.
Important
Keep your API token secure. It provides access to your account and should never be shared publicly or committed to a public code repository.
Step 2: Create a Booking App
Once you have your API token, you can create your Booking App.
- Open the Booking Apps section.
- Click Create Booking App.
- Complete the configuration fields.
| Setting | Description |
|---|---|
| Mode | Choose whether the booking app is for Meeting Rooms or Desks. |
| Slug | The unique URL identifier for your booking app. (Automatically generated or customizable, depending on your configuration.) |
| Primary Color | Select the primary brand color used throughout the booking interface. |
| Terms & Conditions URL | Enter the link to your Terms & Conditions page. |
| Return Home URL | Enter the URL users should return to after completing a booking. |
| Favicon URL | Provide the URL of your website's favicon. |
| Hide Location Tags | Hide the feature and location tags displayed on location cards. |
| Embed in iFrame | Enable this option if you plan to embed the booking app inside an iframe on your website. |
| Assign Customers to All Locations | When enabled, customers created through this booking app are added to every location in your shared database instead of only the booked location. |
After completing the configuration, click Create.
Step 3: Customize the Theme
After creating the Booking App, you can customize its appearance.
- Open the Booking App.
- Click the Edit (pencil) icon.
- On the General page, open the Theme tab.
The following settings are available:
| Setting | Description |
| Quick Presets | Choose from predefined color themes. |
| Color Scheme | Select either Light or Dark mode. |
| Surface Palette | Customize the colors used for cards, backgrounds, and interface elements. |
| Page Background | Set the background color of the booking pages. |
| Border Radius | Adjust how rounded interface elements appear. |
| Font Size | Select the default font size. |
| Font Family | Choose the font used throughout the booking app. |
When you're finished, click Save Theme.

Step 4: Add the Booker to Your Website
Once your Booking App is configured:
- Return to the Booking apps again
- Copy the generated Booking App URL.
- Add this URL to the buttons or links on your website that should open the booking experience.

Step 5: Test Your Booking App
Before publishing your website, verify that everything works correctly.
Check that:
- ✅ The booking interface loads successfully.
- ✅ The layout works properly on both desktop and mobile devices.
- ✅ Available rooms or desks update instantly when users change dates or times.
- ✅ Test bookings appear immediately in your Zapfloor dashboard.
- ✅ Payments are successfully processed through Stripe.
Once these checks are complete, your Zapfloor Booker is ready for your visit.